
Uncategorized
Rubber Seal Profiles for Toolboxes and Van Shelving: A Practical Selection Guide
Oct
This guide is written for Australian fabricators, tradies and van-fit buyers who already understand the basics and want a practical framework for making better seal selection decisions. You will learn how different profile shapes (D, P, U, T, and E) function under real working conditions, how to match seal geometry to gap dimensions, and how to address failure modes before they appear. The guide also covers why cabin pressure management matters more than most buyers realise when specifying seals for van applications.
Most toolboxes and site boxes eventually let water in. Not because of poor construction, but because the rubber seal fails first. It compresses unevenly, loses its memory, and stops forming a consistent barrier against rain, road dust, and vibration. By that point, the damage is already done.
Choosing the right rubber seal profile from the outset is a decision that sits at the intersection of three variables: gap width, available compression force, and the specific environmental threat you are sealing against. Get that combination wrong and even a well-fabricated toolbox or van shelving unit will underperform in the field.
Why Most Toolboxes and Site Boxes Fail at the Seal
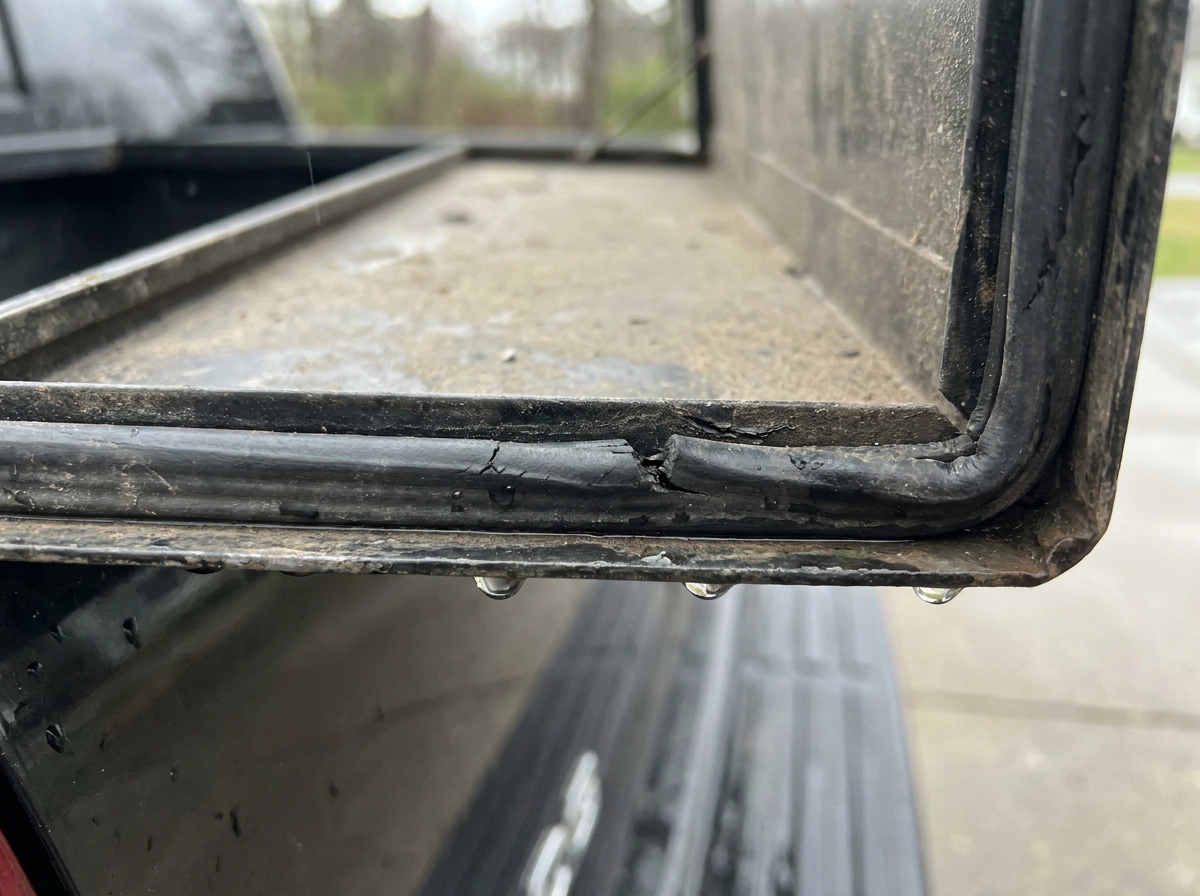
Standard rubber seals wear down, compress, and eventually lose their form, allowing water ingress, and the weather seal is typically the first component to fail, not the latch, hinge or body. Standard rubber seals compress under repeated closure loads, lose their elastic memory and stop recovering to their original cross-section. Once that happens, water collects at the lowest point of the lid and finds its way in, even when the box looks closed and latched correctly.
Dust ingress follows a different failure path. Fine road dust does not need a complete seal failure to enter; it exploits micro-gaps produced by uneven compression across a long door frame run. A seal can maintain contact at the top of a lid while losing consistent pressure at the sides, leaving gaps too small to see but large enough to admit very fine particles. The seal appears intact, yet the dust-protection function is already compromised.
Vibration adds a third failure mechanism. Road surfaces cause seals to micro-move against the frame repeatedly, abrading the seal surface and fatiguing the adhesive bond beneath it. Rattling or squeaking under load is not a nuisance; it is an early warning that bond degradation is under way before any visual sign appears.
The underlying cause of premature replacement in most cases is specification by appearance, choosing a profile because it looks close enough rather than because the gap width and available compression force support it.
A three-variable framework, covering gap width, compression force and environmental threat, resolves most of these errors before installation begins. The sections that follow work through each variable in sequence.
The Three Variables That Drive Profile Selection

Three variables determine which seal profile belongs on any given door or lid. Work through them in sequence.
Gap width is the first and non-negotiable filter. Measure the uncompressed gap between door and frame at the point of closure. A profile too small leaves a residual opening; one too large creates uneven compression stress, accelerates compression set, and often prevents the door from closing flush.
Compression force available is fixed by the closure system: latch type, latch count, and hinge stiffness. This cannot be adjusted after fabrication. Match the profile’s compression requirement to what the closure system actually delivers.
Environmental threat determines both material specification and profile geometry. The specific material and geometry choices for each environmental condition are covered in detail in the dedicated section below.
These three variables interact. A wide-gap van shelving door with a magnetic catch on a dusty construction site is a fundamentally different specification problem than a narrow-gap site box with heavy compression latches in a coastal environment.
Sequencing the assessment, gap width first, compression force second, environmental threat third, produces a workable shortlist of suitable profiles. The final selection within that shortlist comes down to material and durometer.
The Main Rubber Seal Profile Shapes and What Each One Does
With your three variables identified, you can map them against the six main profile families.
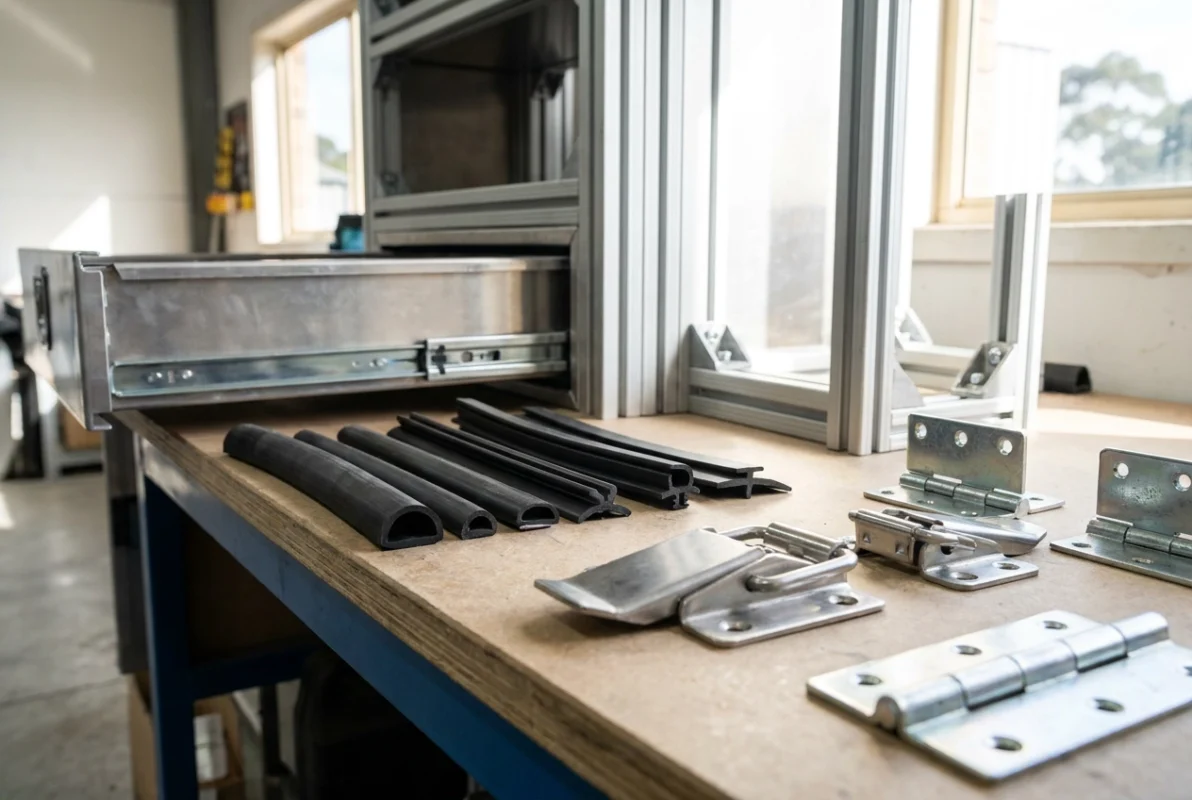
D-profile seals suit gaps of roughly 8–14mm where the door edge compresses the bulb against a flat frame surface. The asymmetric cross-section delivers a progressive compression curve, so the seal remains effective even when the gap varies slightly along a long door run.
P-profile seals carry a larger, rounder bulb on a flat foot. They perform best where the door face meets the seal face-on rather than edge-on, which is typical on van shelving doors and canopy lids where the closure panel is wide and latch pull is distributed across the frame.
E-profile and double-lip door frame seals create multi-point contact in a single pass. Where replacement door seals must span a worn or irregular frame rebate without full remediation, the additional lips compensate for surface variation that a single-bulb profile would bridge inconsistently.
U-channel and edge-trim profiles grip around a panel edge rather than bonding to a flat face. On site boxes with raw steel or aluminium edges, they simultaneously protect the edge from corrosion and provide a sealing surface, removing the need for a separate edge primer or trim.
T-slot and bulb-on-stem profiles insert into a machined or extruded groove, recessing the seal flush with the frame. This mechanical retention resists pull-out under vibration far better than any adhesive-mounted option, making them standard in professionally fabricated toolboxes and drawer systems.
Co-extruded profiles combine a dense rubber foot with a softer, low-durometer bulb in a single extrusion. The dense base resists UV and thermal cycling; the compliant bulb maintains contact pressure. By separating these material duties into two compounds, the profile avoids the most common failure mode: a base that cracks while the bulb is still serviceable.
Matching Seal Profile to Gap Width: A Practical Sizing Approach
Knowing which profile family suits your application is only useful once you have an accurate gap measurement to match against it.
Measure first, select second. Run a feeler gauge or steel rule along the full perimeter, recording the gap at the tightest and widest points. Any measurable variation across the perimeter signals a frame alignment issue; no seal profile will correct that, only partially mask it. Fix the alignment before specifying the seal.
Gap 5–8mm: A D-profile is the correct starting point. Select a bulb diameter that allows full compression travel without bottoming out against the frame base. This delivers sufficient compression travel across minor frame variation without causing premature compression set.
Gap 8–14mm: Move to a P-profile or large-bulb D-profile. Match the bulb diameter closely to the gap width rather than oversizing; a bulb compressed significantly beyond its design range demands higher closure force and accelerates fatigue at the bulb wall.
Gap under 5mm: Common in precision-welded toolboxes and aluminium extrusion systems, tight clearances rule out bulb profiles entirely. A bulb that cannot compress to the required gap generates back-pressure that prevents full closure. Low-profile ribbed or flap-type rubber seals are the correct choice here.
Prototype before committing. Cut a short test section, compress it by hand to the measured gap width, and confirm the bulb deflects cleanly without rolling, inverting, or extruding past the frame edge. A profile that passes this check on the bench will perform correctly around the full perimeter.
Matching Seal Spec to Environmental Threat: Weather, Dust and Vibration
Once gap width and compression force are confirmed, the environmental threat determines material spec and profile geometry.
Rain and water ingress. A continuous closed-bulb profile with no splices at corners gives the most reliable water exclusion. Corner joints and butt-joined ends are common points of water entry on any exposed toolbox or site box lid. Moulded corner pieces or vulcanised joins are strongly preferable to cut-and-butt installation; a square butt joint that looks acceptable at fitting will open under thermal cycling.
Dust on construction sites and outback runs. Very fine silica dust requires multi-lip or ribbed seal designs that create sequential barrier zones. A single-bulb D-profile that performs reliably against rain will still pass fine dust if compression is not maintained uniformly across the full frame run.
UV and thermal cycling. EPDM outperforms neoprene and standard PVC in high-UV, high-temperature service with excellent ozone resistance. Surface cracking from UV exposure is the primary failure mechanism on ute toolboxes and canopy lids facing direct sun, and the degradation is often invisible until the seal is flexed.
Coastal salt environments. EPDM and silicone profiles resist salt corrosion and ozone degradation. Neoprene performs adequately but degrades faster under prolonged salt spray. The adhesive bond can be a weak point in salt-exposed applications; mechanical retention addresses this where the frame design allows it.
Vibration and road noise. A seal that is too hard transmits vibration rather than absorbing it, causing rattling and progressive frame wear. Softer bulb profiles provide enough compliance to damp road vibration without losing contact force at highway speed.
Van Shelving and Dust Control: Why Seals Are Only Part of the Answer
Vibration compliance addresses one dimension of van shelving performance, but dust control in working vans requires a different frame of reference entirely.
Sealing door frames is necessary but not sufficient. A van body running at negative relative pressure is more likely to draw fine particles through any residual micro-gap than one maintained at neutral or positive pressure, which is why ventilation management complements rather than replaces seal upgrades. Roof vents or directional vent systems that establish positive cabin pressure are more effective at preventing dust intrusion than seal upgrades alone, because they reverse the driving force.
When specifying replacement door seals for van shelving, the door type determines the correct profile. Sliding doors typically require low-friction brush or flap seals rather than bulb profiles, which can create drag or wear from repeated scraping on the opening stroke. Hinged doors can accept higher-compression bulb profiles because the hinge provides mechanical advantage on the closing stroke.
Cable and harness penetrations through bulkheads are consistently overlooked. Sealing every door frame on a van fit-out while leaving ungrommeted wiring holes produces diminishing returns; those penetrations become the dominant dust path once the doors are addressed.
For construction and mining support vehicles, a multi-lip door frame seal combined with positive pressure ventilation covers both requirements: the seal provides contact-point exclusion, and the ventilation removes the pressure differential that defeats it.
On inspection schedules, prioritise bottom corners of door frames over full-perimeter checks. Grit and moisture accumulate at the lowest corners, accelerating local degradation well ahead of the rest of the seal run.
Common Seal Failure Modes and How Profile Choice Prevents Them
Five distinct mechanisms account for the majority of in-service seal failures.
Compression set occurs when a seal is consistently over-compressed, leaving the rubber permanently deformed and unable to recover contact force. Choosing a profile whose bulb volume is proportionate to the gap prevents the rubber from bottoming out on every closure cycle.
Adhesive bond failure is the dominant failure mode for surface-mounted seals on van shelving and site boxes subject to road vibration. Repeated micro-movement fatigues the adhesive interface until sections lift away from the frame. Specify mechanical retention at the design stage in high-vibration applications.
Corner splitting is caused by bending a profile around a radius tighter than its designed minimum. P-profile and E-profile seals with wide, stiff feet are particularly susceptible. Specifying a profile with a narrower foot, or using moulded corner pieces, removes the bending stress at these points.
UV surface crazing hardens the outer skin of the rubber without visibly damaging the bulk of the profile, creating dust bypass paths invisible until the seal is flexed, as covered in the environmental threat section above. EPDM or silicone profiles with inherent UV stabilisation are the correct specification for any externally exposed application.
Profile roll-out occurs when repeated impact loading, such as a site box lid dropped closed, causes a surface-mounted bulb to displace laterally rather than compress vertically. A T-slot retained profile or a wider bonded foot resists this displacement.
Installation Considerations That Affect Seal Performance
Correct profile selection fails at installation more often than it fails at specification. The following five practices determine whether a correctly chosen seal actually performs.
Surface preparation is the single most important variable. Oil residue, mill scale, anodising release agents and silicone contamination from powder coat processing all prevent adhesive bond formation. Clean bonding surfaces with isopropyl alcohol and allow full solvent flash-off before applying contact adhesive or self-amalgamating tape. Skipping this step on a freshly fabricated aluminium toolbox is the most common cause of seal lift within the first season.
Never stretch a seal to make a short length fit. Internal tension from stretching accelerates compression set and causes the profile to contract away from corners after the adhesive cures. Cut lengths with a small amount of slack and allow the profile to relax fully before final bonding.
Join quality matters as much as adhesive coverage. Square butt-ends open under thermal cycling. Cut butt joints at 45 degrees and bond with compatible contact adhesive or vulcanising compound.
For replacement door seals, measure the channel in the frame, not the old seal. The existing seal will have compressed and distorted from its original dimensions, making it an unreliable reference for ordering a replacement profile cross-section.
Trailer Parts Direct supplies rubber seal profiles in continuous lengths, cut to any perimeter run. Order to your measured perimeter plus a modest allowance above your measured perimeter to cover corner trimming and any re-cuts during fitting.
Choosing the Right Rubber Seal Profile: Key Takeaways
With installation variables addressed, these five rules govern every profile selection decision.
Measure gap width across the full perimeter before specifying any seal. Significant variation between the tightest and widest point indicates a frame alignment or fabrication issue; resolve any significant frame variation before specifying a seal.
Match the profile’s required compression load to your closure system. Compression force is fixed by your latch count, latch type and hinge stiffness. A profile requiring high compression load to form an effective seal will underperform permanently on a light-duty single latch, regardless of how well it is bonded.
Specify EPDM as the default material for any externally exposed application. UV surface crazing and thermal cycling are the primary failure mechanisms for seals on ute toolboxes, canopy lids and site boxes in Australian conditions. EPDM resists both; neoprene and standard PVC do not.
For van applications, address cabin pressure differentials before upgrading seals. Positive cabin pressure through roof or directional vents reduces dust intrusion more reliably than seal upgrades alone, and seal improvements deliver diminishing returns while a pressure differential remains unaddressed.
Specify mechanical retention at the design stage in high-vibration applications. T-slot and U-channel profiles eliminate adhesive bond fatigue entirely. Retrofitting mechanical retention after fabrication is significantly more difficult; the decision belongs at the design stage, not after the first seal failure.